
Introduction
AWS AppStream 2.0 is a fully managed service that allows you to stream desktop applications to users without managing underlying infrastructure. By integrating it with IAM Identity Center (formerly AWS Single Sign-On), you can enable secure, seamless access to AppStream stacks using SAML 2.0 federation.
In this post, I’ll walk through how to integrate IAM Identity Center and AppStream 2.0 using SAML — including the full configuration I used in production.
Logical
Key Features
IAM Identity Center
IAM Identity Center is AWS’s native identity management service that enables:
- Centralized user and group access management across AWS accounts and applications
- Integration with external identity sources (e.g., Active Directory)
- Federated access via SAML 2.0 to AWS and third-party apps
It’s a unified way to manage identity for your AWS environment and beyond.
AppStream 2.0
AWS AppStream 2.0 lets you stream desktop applications hosted in AWS to any device with a browser. It’s fully managed, scalable, and ideal for delivering legacy apps, internal tools, and even full desktops.
An AppStream setup typically includes:
- A fleet of instances running your apps
- A stack that controls user access and settings
- SAML 2.0 federation for identity integration
Integration Goal
We want users in IAM Identity Center to launch an AppStream stack called MyTestApp using SAML SSO. No AWS credentials or manual IAM user setup required.
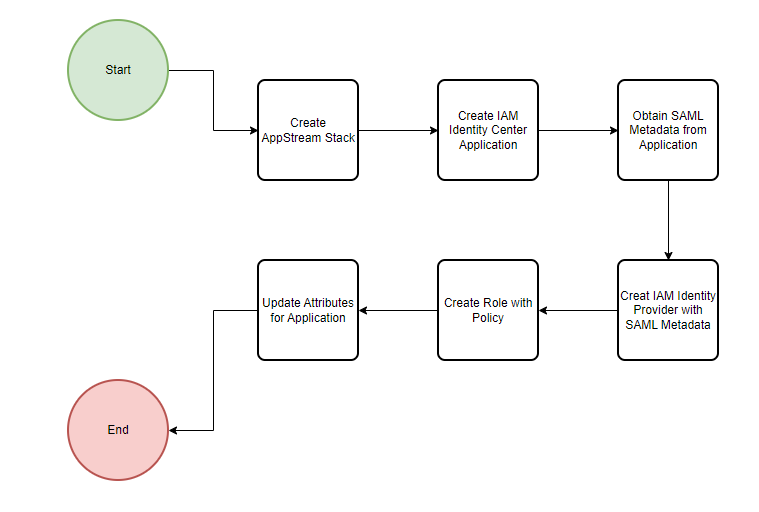
Step 1: Create the AppStream Stack
- Open AppStream 2.0 in the AWS console.
- Create a fleet and ensure it is running
- Create a stack, set a name to the stack (e.g., MyTestApp) and associate it to the fleet above.
Step 2: Create a Custom SAML Application in IAM Identity Center
- Go to IAM Identity Center > Applications.
- Click Add a new application > Custom SAML 2.0 application.
- Set a name (e.g.,
My Test App).
Fill out the following fields:
- Relay State:
https://appstream2.us-east-1.aws.amazon.com/saml?stack=MyTestApp&accountId=123456789- Notice the stack= is set to the name (case matters) as the Stack name above
- Notice the accountId= is the AWS Account ID where the the AppStream application resides
- Application ACS URL:
https://signin.aws.amazon.com/saml - SAML Audience URI:
urn:amazon:webservices
Download the SAML metadata file — you’ll use this in the next step.
Step 3: Create an IAM Identity Provider
- Go to IAM > Identity Providers in the AWS console.
- Choose Add provider > SAML.
- Set the name as
MyTestApp. - Upload the metadata file from the previous step.
Step 4: Create the IAM Role for AppStream Access
- Create an IAM role named
appstream-MyTestAppwith the following:
Trust relationship (notice the Federated value has the AWS account ID where the Identity Provider was created above as well as the name of the Identity Provider that was given):
{
  "Version": "2012-10-17",
  "Statement": [
    {
      "Effect": "Allow",
      "Principal": {
        "Federated": "arn:aws:iam::123456789:saml-provider/MyTestApp"
      },
      "Action": "sts:AssumeRoleWithSAML",
      "Condition": {
        "StringEquals": {
          "SAML:sub_type": "persistent"
        }
      }
    }
  ]
}
Permissions policy (This can be an INLINE policy. Notice that the Resource value has the AWS account ID where the Appstream Stack resides as well as the Appstream Stack Name):
{
  "Version": "2012-10-17",
  "Statement": [
    {
      "Effect": "Allow",
      "Action": "appstream:Stream",
      "Resource": "arn:aws:appstream:us-east-1:123456789:stack/MyTestApp",
      "Condition": {
        "StringEquals": {
          "appstream:userId": "${saml:sub}"
        }
      }
    }
  ]
}
Step 5: Set Attribute Mappings in IAM Identity Center
Go back to the IAM Identity Center and find the application that was just created.
Click on Actions and click on edit attribute mappings. Fill in the sections below:
| Attribute URL | Format | Value |
|---|---|---|
Subject | persistent | ${user:email} |
https://aws.amazon.com/SAML/Attributes/Role | unspecified | arn:aws:iam::123456789:role/appstream-MyTestApp,arn:aws:iam::123456789:saml-provider/MyTestApp |
https://aws.amazon.com/SAML/Attributes/RoleSessionName | unspecified | ${user:email} |
Notice the AWS account ID, the role name, as well as the Identity Provider name that were created earlier.
Step 6: Assign Access
- Click on Assign users and groups.
- Choose the users and/or groups to assign the application to.
Step 6: Test Access
- As an assigned user, go to the IAM Identity Center/SSO user portal.
- Click on the Applications tab
- Click on the MyTestApp application.
- You should be seamlessly authenticated and redirected into your AppStream session.
Summary
By federating AppStream 2.0 with IAM Identity Center using SAML, you gain:
- Centralized access control via email-based SSO
- No need for AWS-specific user provisioning
- A clean, secure user experience
This is a scalable and secure way to deliver applications to your workforce with AWS-native tools.